Date Fields
📚 Updated Documentation Available
This article has been split into individual field articles for better organization.
Please visit the following updated articles in the Fields category for the most current information:
The Date Field type category includes the four Date Field types pictured in the image below. These Date Field types are primarily used to track any dates and times associated with your data.

We will define each of these four Date Field types within this article.
Date
Date Fields hold values that represent a specified month, day, and year.
Sample Date Field:

At default, date formatting is set to MM/dd/yyyy (02/15/2010). If you wish to change your default date formatting, you can do so within the Settings tab of your app's navigation bar > General Settings tab > Date Format setting.

Creating a Date Field
To add a new Date Field to your data table, click on the Date Field type category on the Add Field menu and select the Date Field type from the drop-down list.

When creating a Date Field, there are several settings you can customize such as those highlighted in the image below.

- Name- this is where you can name your Date Field. For instance, "Job Date" or "Deadline".
- Description- this is where you can optionally provide a brief description of this field for your own reference.
- Default Form Value- this is where you can set a default date value to automatically populate within a form. At default, the Default Form Value is set to None, meaning no default date value will automatically populate within forms.

If you choose to set a Default Form Value, you can select the Current Date or a Specific Date. For instance, if you set the Default Form Value to a specific date of 02/01/2020, forms will automatically populate as such:


Time
Time Fields store values that represent a specified hour and minute of a day.
Sample Time Field:

At default, time formatting is set to hh:mm a (09:36 PM). If you wish to change this default time formatting, you can do so within the Settings tab of your app's navigation bar > General Settings tab > Time Format setting.

Creating a Time Field
To add a new Time Field to your data table, click on the Date field type category on the Add Field menu and select the Time Field type from the drop-down list.

When creating a Time Field, there are several settings you can customize such as those highlighted in the image below.

- Name- this is where you can name your Time Field. For instance, "Clock Out Time" or "Meeting Time".
- Description- this is where you can optionally provide a brief description of this field for your own reference.
- Default Form Value- this is where you can set a default time value to automatically populate within a form. At default, the Default Form Value is set to None, meaning no default time value will automatically populate within forms.

If you choose to set a Default Form Value, you can select the Current Time or a Specific Time. For instance, if you set the Default Form Value to a specific time of 09:00 AM, forms will automatically populate as such:


Date & Time
Date/Time Fields store values that represent a specific date (day, month, year) and time (hour, minute, AM/PM when applicable).
Sample Date/Time Field:

Creating a Date/Time Field
To add a new Date/Time Field to your data table, click on the Date Field type category on the Add Field menu and select the Date/Time Field type from the drop-down list.

When creating a Date/Time field, there are several settings you can customize such as those highlighted in the image below.

- Name- this is where you can name your Date/Time field. For instance, "Note Created" or "Job Date and Time".
- Description- this is where you can optionally provide a brief description of this field for your own reference.
- Default Form Value- this is where you can set a default date/time value to automatically populate within a form. At default, the Default Form Value is set to None, meaning no default date/time value will automatically populate within forms.

If you choose to set a Default Form Value, you can select the Current Date/Time or a Specific Date/Time. For instance, if you set the Default Form Value to a specific date/time of 02/01/2020 12:00 PM, forms will automatically populate as such:


Date Range
Date Range Fields enable you to set a duration of time with a start and end value.
The start and end values, similar to Date/Time Fields, hold a date, hour, and minute value.
Sample Date Range Field:

Creating a Date Range Field
To add a new Date Range Field to your data table, click on the Date Field type category on the Date category and select the Date Range field type from the drop-down list.

When creating a Date Range Field, there are several settings you can customize such as those highlighted in the image below.
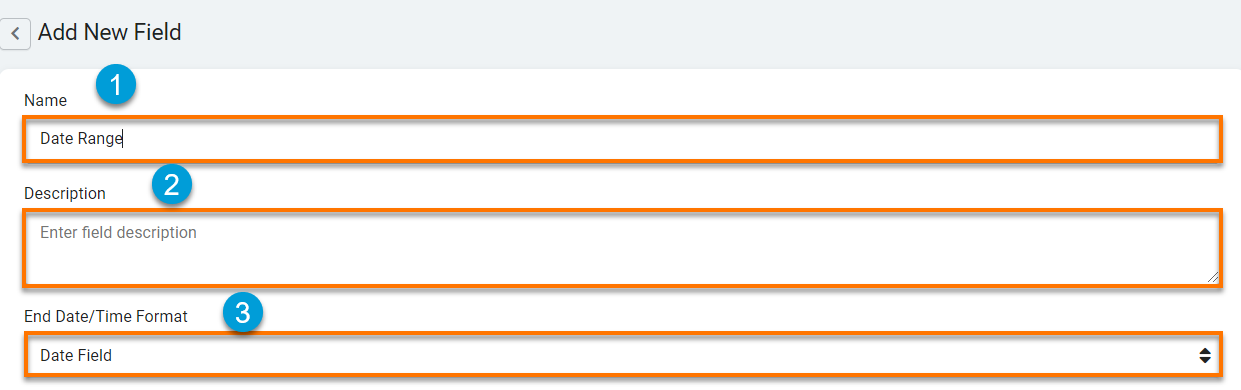
- Name- this is where you can name your Date Range field. For instance, "Vacation Request" or "Appointment Time".
- Description- this is where you can optionally provide a brief description of this field for your own reference.
- End Date/Time Format- this is where you can choose the formatting for how the end date and time will be entered on a form component. While the Start Date Format will always display as a Date/Time Field on forms, you have the option to prompt your users to select an End Date/Time Format of either a Date/Time field, Time Field, or Duration Field.
At default, end Date/Time formatting is set to show a Date/Time field. on forms This means that on a form component, users will be prompted to choose an end date and time with a Date/Time field format. Keeping the End Date/Time Format as the default Date/Time field formatting is useful for when you would like to prompt your users to select a date and time as the end date on a form. For instance, if you have an Employee Management application where users can request time off, you will choose the default Date/Time field as the end Date/Time format to enable users to select a date and time for their last vacation day.

There may be circumstances when you want to prompt your users to select a Duration field as their end date/time on a form. This can be useful in circumstances when the end date is the same and the start date and you want to prompt users to select a specific time duration as the end date/time. For instance, if you have an appointment scheduler application to coordinate appointments for a doctor's office, you will choose the Duration field as the end date/time format to enable employees/schedulers to schedule appointments with specific time duration such as 30 minute appointments or 1 hour appointments.

Alternatively, there may be circumstances when you want to prompt your users to select a Time field as their end date/time on a form. This can be useful in circumstances where the end date is the same date as the start date and you want to prompt users to select a specific time as the end date/time. For instance, if you have an Event Management application and would like to schedule events that are contracted to end at specific times on the event day, you would choose the Time Field end date/time format to display a Date/Time Field as the start date and only a Time Field as the end date.

End Date/Time Format settings will only affect how end Date/Time Fields are entered on a form. This setting does not affect how end Date/Time Fields saved within a form will be displayed when viewed within other components. When displayed, both start and end values will be displayed as Date/Time Fields.
Countdown and Age
With any Date/Time field, you are able to further customize the output format and display date/time values as an Age or as a Countdown via a Stopwatch/Timer. Click here to learn more about further customizing date/time field outputs.
We'd love to hear your feedback.