Plaid Pipe
Allow your users to connect their bank accounts to your app via the Plaid API.
Follow the steps below to utilize all the API calls in the Plaid Pipe.
Step 1: Create your app
B) Select the Finance industry and the Financial Management feature
D) Create a Table Rule to save the Tadabase Record ID to the Record ID field you just created. (Resave the existing records to update this field.)
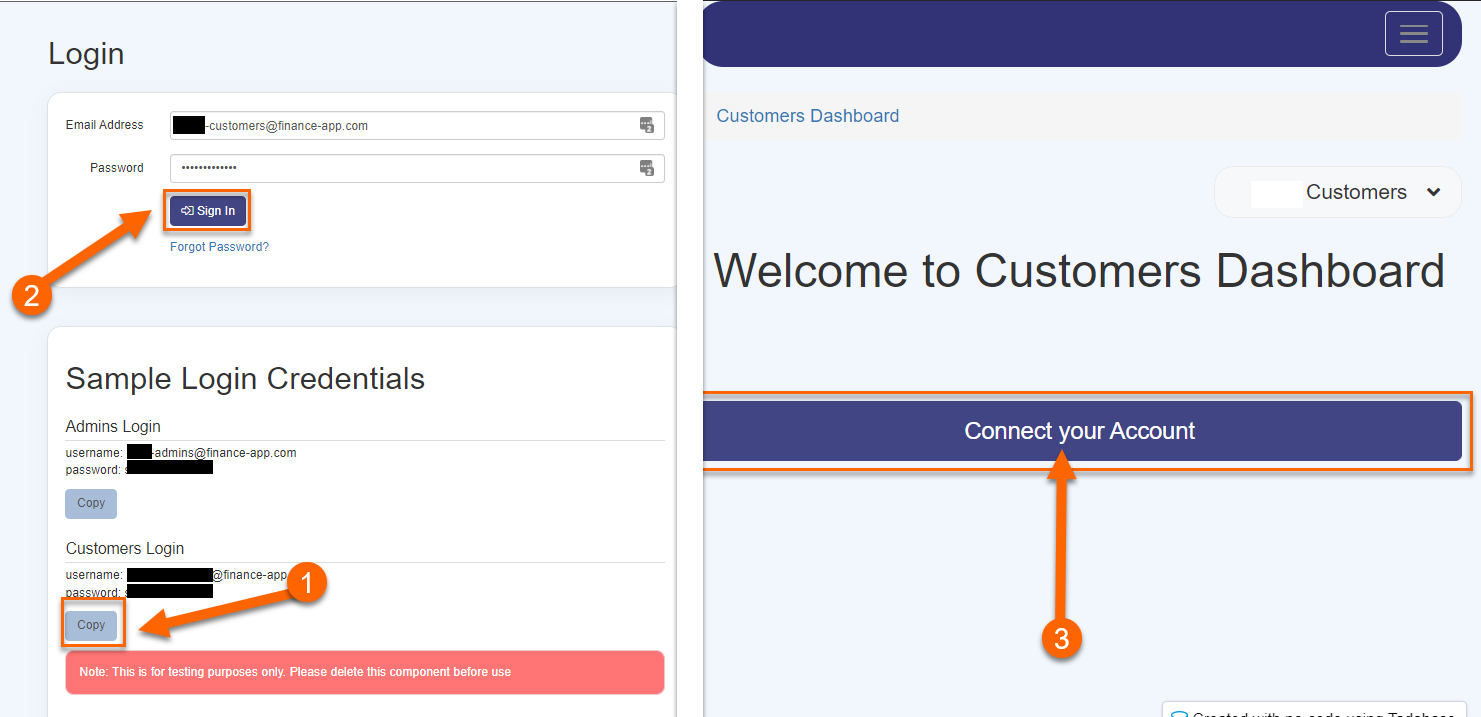
Step 2: Add a "Connect your Account" button to your Customers Dashboard page.
<p> </p>
<p><button id="authorize" class="btn btn-primary btn-lg btn-block">Connect your Account</button></p>
<p style="text-align: center;"> </p>
Step 3: Install the Plaid pipe.
A) Install the Plaid Pipe.

B) Create or login to your Plaid Account, copy your Plaid API Keys (Sandbox, for testing purposes), and paste them into the Global Parameters section of your newly installed pipe.

Step 4: Install the Tadabase Rest API (Updated) pipe.
A) Install the Tadabase Rest API (Updated) pipe.

C) Copy and paste the key values into the Global Parameters section of the Tadabase Rest API Pipe. Then, click Save.

Step 5: Configure the Tadabase Rest API (Updated) pipe.
A) In the Tadabase Rest API (Updated) pipe that you installed, find the "Update an Existing Record" API call, and open up the Parameters tab. In the Table ID Default Value field, paste the Table ID of the Users table. In the Field ID Default Value field, paste the Field ID of the Plaid Access Token field in the Users Table. Then, click Save.
You can find the Table ID, by navigating to the Table in the Data Builder and checking the URL. The ID after 'dataTables/' is the table ID (ex: 4MXQJdrZ6v). You can find the Field ID, by opening the field settings in the Data Table and checking the URL. The ID after 'fields/' is the field ID (ex: field_62).

Step 6: Follow the 3 step Plaid flow to allow users to Connect their Accounts to your App.
Plaid Authentication Flow:
- Create a temporary Link Token for the user
- Open the Plaid login window, and allow the user to sign in with their credentials.
- Exchange the resulting temporary public_token for a permanent access_token for that account.
This will can be done by adding JavaScript to your page. All the steps and code is provided below.
A) In your Customer Dashboard page, navigate to the JavaScript tab.

B) Create two variables user_id and record_id and set them to the logged-in fields of Username and Record ID respectively. Then, click Save.
//Get Logged In User Variables  - Record ID, Username
var user_id = '{loggedInUser.Username}';
var record_id = '{loggedInUser.Record ID}'
C) Navigate back to the Plaid pipe you installed, and open up the 'Get Link Token' API call. In the Overview tab, click the 'copy code' button at the bottom. Paste the code into the JavaScript tab of the Customers Dashboard page.
//Get Link Token with Pipe
TB.triggerPipe('eyJpdiI6ImhHTktkSElnYVZVZFIrSnRnVTNQZnc9PSIsInZhbHVlIjoicWlrMmN1d0hKU2lPZFwvYko2bTJvSjV2YnlkbW1NRDdpRzdOazVTa3VzZFk9IiwibWFjIjoiOGUwMmU4ZmFhZGRhNjAyNzNiNGY0ZDc5NTllZGNhMjA3MDM3MjJlNTE3ZjFjYTEzZDUxYjc0NzUzMTNjM2E5YiJ9',
	{name: 'Finance App',user_id: '',products: '"auth", "income","assets"'},
	function(type, response, xhrRespone) {
		console.log('pipe resonpose', type, response, xhrRespone);
		 //Create a Plaid Handler with the Link token

    //Call the function above and open the Plaid Handler when the "Connect your Account" Button is clicked.
	}
);
D) In the pipe code added in the previous step, replace the 'user_id' with the 'user_id' variable we created previously.

Optional: For the products field, replace "auth","income","assets" with the Plaid products you would like access to.
|
Plaid Product values:
assets, auth, employment, identity, income_verification, identity_verification, investments, liabilities, payment_initiation, standing_orders, transactions, transfer |
Note: The availability of certain Plaid products will depend on the configuration of your Plaid account. Always include the minimum number of products required.
E) Paste the following code snippet below the console.log('pipe resonpose', type, response, xhrRespone); line in the JavaScript tab of your Customer Dashboard page. This will open the Plaid handler when the "Connect your Account" button is clicked on the page. (See the Plaid Docs for mor details.)
       //Create a Plaid Handler with the Link token
        if (1 || type == 'success') {

            var token = response.link_token;

            const handler = Plaid.create({

                token: token,

                onSuccess: (public_token, metadata) => {

                    exchangeToken(public_token);

                },
                onLoad: () => { },
                onExit: (err, metadata) => { },
                onEvent: (eventName, metadata) => {

                    //Afterwards, redirect to a specific page
                    if (eventName === "HANDOFF") {
                        window.location.href = "/";

                    }
                },

            });

            //Call the function above and open the Plaid Handler when the "Connect your Account" Button is clicked.
            $("#authorize").click(function () {

                handler.open();
            });
        } else {

        }
F) Then, add the following code snippet to the bottom of the JavaScript file.
//Function to Save the Access Token to your Database using the Tadabase Rest API - Update Existing Record Pipe call.
function saveToDB(access_token) {
    //saveToDB Function Body
}
//Exchange the Temporary Public Token for an Access Token and Save it to your Database
function exchangeToken(public_token){
    //exchangeToken Function Body
}
G) Navigate to your Tadabase Rest API (Updated) pipe and open up the Update Existing Record API call. In the Overview tab, click "Copy Code" and paste the code in the JavaScript tab of your Customer Dashboard page under the words //saveToDB Function Body.

H) In the pipe code pasted above, replace the field value parameter with access_token and the record ID parameter with record_id.


J) In the pipe code added above, replace the public_token parameter with public_token.

K) Lastly, add the following code snippet below console.log('pipe resonpose', type, response, xhrRespone); in the exchangeToken function. This will save the Plaid Access token back to your database.
//Save the Returned Access Token to your Database
saveToDB(response.access_token);
Step 7: Add the Plaid JavaScript Library to make the above code work.
A) The Plaid JavaScript library is required. Navigate to Settings, Custom Header/Footer Code, and paste the following code into the header.
<script src="https://cdn.plaid.com/link/v2/stable/link-initialize.js"></script>
Step 8: Automatically Create a User in Plaid when a User is added in Tadabase
A) Add a Table Rule to the Users table.
B) In the Table Rule you created, click Trigger Pipe and select Plaid from the list of options.
C) Set the Pipe parameter of Client User ID to a Record Value of Username.
D) Save the Pipe value of User Token to the Plaid User Token Record.

Step 9: Edit the default customer user. Enter a unique username for the user.

Step 10: Now test it out! Sign in as a Customer and click "Connect to your Account"
 Login to any account using the Sandbox credentials
 user_good and pass_good
We'd love to hear your feedback.