Using Pipes
This article is currently under construction.
Pipes can be used in several different sections of your app:
- Data Source
- Form Fields
- Validation Rules
- Record Rules
- HTML Component
- Page Rules
- Table Rules
- Action Links
Let's discuss each place in your app where you can use Pipes as well as how to go about adding Pipes within that scenario.
Data Source
Inside the Data Source of a data component, you can add pipes to merge external data with values from the database. The type of data you merge is dependent on the pipe being utilized.
Let's look at a simple example of using the Clearbit Pipe which enables you to retrieve more details about a user's email address.
Suppose you have the following data table with email addresses of leads/potential customers.

Your objective is that whenever you view these email accounts within your app, the latest information about these email accounts should by automatically retrieved from Clearbit, and those retrieved values should be displayed as new columns within the Leads data table.
To accomplish this, add or edit/open the Leads table component in the Page Builder, click on the Data Source tab, and click on the Add New Pipe button.

Then, select the Clearbit Pipe which you have installed and select the relevant parameters you want to pass, which in this API call is named "Get Email Details", which will pass the email address for which you want to retrieve more details from Clearbit. You want this email to match the email address from the database, so set the Email to a Record Value of Email.

Once you have enabled this Pipe, a new tab will appear on the left-side menu within the Leads table component called Pipe Fields. Within the Pipe Fields tab will be all the response fields you set to be retrieved from Clearbit for each email address. Click on the response fields to add them to the Leads table components as new columns.

On the live app, the response fields have been added to the Leads table component and will dynamically load with the retrieved values from Clearbit for each email address.

Please Note: It is important to take into account the API limitations for whichever external services you are using.
Form Input
You can also use Pipes in forms to dynamically populate form values with external values retrieved via a pipe.
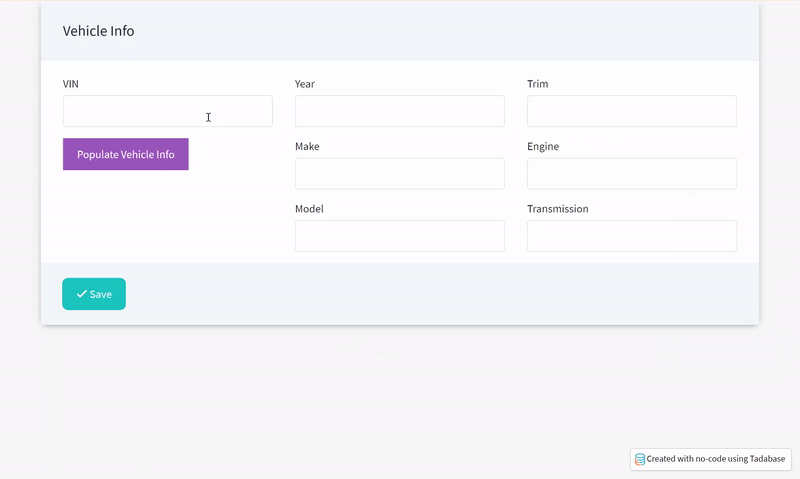
For instance, if you want to automatically gather information on a vehicle based on a VIN number, you can use a pipe to retrieve the vehicle information from an external source and systematically populate the correct form fields with the values returned in the pipe when the VIN number is entered.
Below is a Vehicle Information form. You can create a pipe within the form to automatically populate the form fields with the vehicle's information based on the VIN number entered by each user.

To accomplish this, open the Add Vehicle Info form within the Page Builder and add a Trigger Pipe field.

A Trigger Pipe button will be added to the form. Double click on the Trigger Pipe button to edit it and select the Pipes tab to configure the installed VIN Decoder Pipe parameters and settings.

As you can see in the gif below, when users enter their VIN numbers and press the "Populate Vehicle Info" Trigger Pipe button, their vehicle information will be automatically retrieved and populated within the remaining form fields.
Validation Rules
You can use Validation Rules inside of Pipes to validate data from a Pipe prior to it being submitted.
For instance, suppose you are a moving company, and when users enter their Moving From and Moving To addresses you would like to verify that the distance between the two addresses is under a pre-defined maximum distance, otherwise show them an error message.
To accomplish this, open the Distance Search form component within the Page Builder, select the Validation Rules tab, and use the installed Get Distance Pipe to retrieve the distance between the two addresses entered by a user and show an error message of "Your distance is higher than our current limit" when the distance is greater than 10,000 meters.

Now, when users attempt to submit a moving form with Moving From and Moving To addresses that exceed a 10,000 meters distance, the error message will display and the form will not be submitted.

Record Rules
You can also trigger Pipes within Record Rules which will run after the form is submitted.
For instance, suppose you want to ensure that all data is saved to the database in a proper format. When users create a new article, you want the title of the article to be saved as Title Case regardless of how it was typed. If a user entered an article title of "Here's my first article about web apps", convert the article title to "Here's My First Article About Web Apps" using a Text Function within the Tadabase Utility Pipe.

Now, as you can see in the gif below, article titles will be converted and saved in the correct format.

Important Note: When using pipes inside of Record Rules/Table Rules and Action links the Pipe will only be triggered if a response value is assigned.
When a record is being saved, Tadabase looks at what values must be saved. If one of the values originate from a Pipe, that's when the Pipe is triggered. If no responses are being used in the rule then Tadabase doesn't trigger the Pipe to run.
HTML Component
You can use Pipes within HTML components to load dynamic data directly inside HTML components.
For instance, say you have a Users data table with the Zip Code for each user's location.

Within an HTML component, you can use the Weather Pipe to retrieve the current weather for each user's zip code and dynamically display the current weather for each user within the HTML component.

Within the HTML component, you can add a field placeholder to display the Temperature for each user within custom text.

Now, users will see their current temperature values within this HTML component.

We'd love to hear your feedback.