
Using Webhooks
What are webhooks?
A webhook is a method of enabling apps to communicate with one another. With Tadabase, you can send webhooks to communicate with other external apps and web services.
Please Note: Webhooks are included with subscription plans of Pro and above.
Why use webhooks?
Webhooks are highly valuable for circumstances where you want to trigger something outside of Tadabase based on something that happens inside of Tadabase.
For instance, you can create a webhook stipulating that when a record is created in Tadabase all record details, aka "payload", should be sent to a predefined URL. What occurs at the destination URL is totally up to whatever that external platform is configured to do.
Getting started with webhooks
To get started with webhooks, you must first have a destination URL where you wish to send the payload. For instance:
- You can create a webhook to send messages to a specific Slack channel or specific user in Slack. Click here to learn more:
https://api.slack.com/messaging/webhooks - You can send a WhatsApp message using Twilio's WhatsApp integration. Click here to learn more: https://www.twilio.com/docs/sms/whatsapp/api
- You can add record details to a Google Sheet
- You can send batch emails using Google Scripts
- You can insert many records at one time using Google Scripts
These are just several examples of destination URLs, however the integration possibilities are endless with webhooks. Once you have a destination URL you can begin adding your webhook.
Adding new webhooks
New webhooks can be added to your Tadabase app within the Automation section.
First, navigate to the Automation tab and click on Outgoing Webhooks. Then click on the Create a New Webhook button.

A new window will pop up prompting you to add a new webhook with the following four requirements:
- Data Table
- URL
- Event
- Status
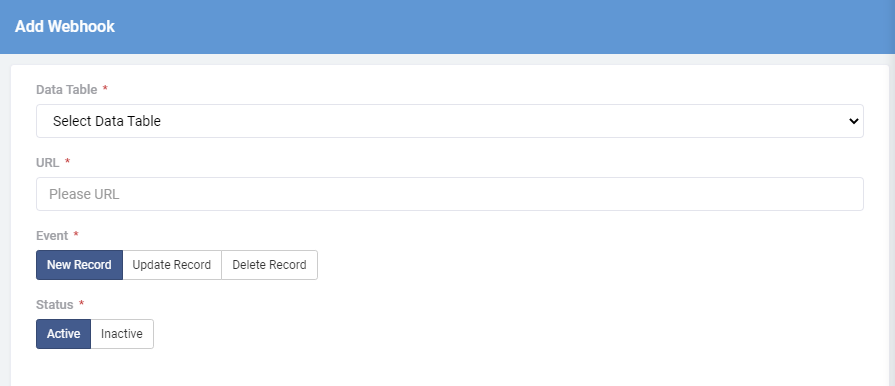
Let's explore each of these three items required when adding a new webhook.
Data Table
This will be the data table the webhook will run on
URL
The URL is the destination URL address that this webhook will be sent to.
Please Note: Your URL must begin with "https://"
Event
The event determines when this webhook will be triggered.
You may choose one of three types of events to trigger your webhook:
- New Record- when a record is created
- Update Record- when a record is edited
- Delete Record- when a record is deleted
Let's explore each of these event types.
Please Note: Your webhook will run regardless of where the change originated. For instance, if you create a webhook to be triggered upon a new record, your webhook will trigger whether you created a new record from the Tadabase Builder, a form, a record rule, etc...
This does not include records added or updated through our API
New Record
When setting the event to New Record, only new values that are saved will be sent in the webhook together with the record ID.
Update Record
The webhook will be triggered when the record is updated. If the record was updated using inline editing, only that value that was edited inline will be sent in the payload with the record ID. If the record was updated via a form, only the fields present in the form will be sent in the payload with the record ID.
Delete Record
The webhook will be triggered when the record is deleted and all fields and values within the record will be sent with the webhook. A common circumstance for this event is when maintaining an offsite backup of records. To learn more about using a webhook to save deleted records offsite, please click here.
Status
Select the status of your webhook as active or inactive.
Testing Webhooks
For the purpose of testing your webhooks we recommend using a site such as webhook.site which will generate a unique URL that can catch the webhook and show you what the payload looks like:

Copy the generated URL and paste it into your webhook in Tadabase. Then complete the event that is set to trigger your webhook, such as create a new record, update a record, or delete a record. Once you have submitted the new/edit/delete record form, you can view the results of your webhook back on Webhook.site:

This testing method will come in handy should you ever need to troubleshoot what your webhook is sending.
Sample Webhook Script for Python:
from flask import Flask, request, Response
import os
app = Flask(__name__)

@app.route("/")
def hello():
    return "Hello World!"

@app.route('/webhook',methods=['POST'])
def webhook():
    print("Data recieved from Webhook is: ", request.form)
    data = request.form

    print(data['id'])
    print(data['field_31'])
    return Response("okay", status=200)

host = 'localhost'

if __name__ == '__main__':
    app.debug = True
    port = int(os.environ.get("PORT", 8080))
    app.run(host='0.0.0.0', port=port)