Complex Formula (Count, Max, Min, Avg, Sum)
Count
Count fields are complex formula fields that are designed to count records of a connected data table.
Unlike Basic Formulas, Complex Formulas such as Count fields work with connected records.
For instance, say you have an Employees data table, a Tasks data table, and a connection field joining these two data tables which assigns each task to an employee. With a Count field, you can create a complex formula to count the Total Tasks assigned to each employee at any given time.
Sample Count Field:

Creating a count field
To add a new Count Field to your data table, click on the Number field type category on the Add Field menu and select the count field type from the drop-down list.

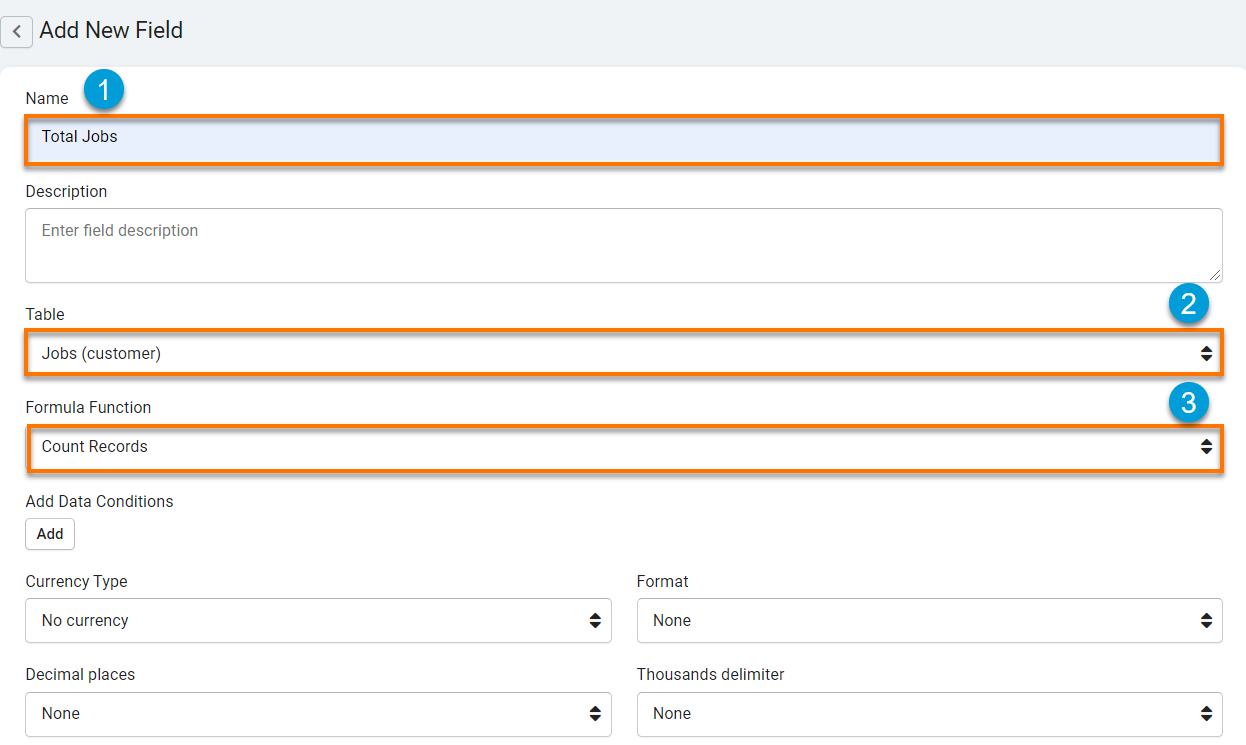
When creating a Count field, there are several settings you can customize such as those highlighted in the image below.

-
Name- this is where you can name your Count field. For instance, "Total Jobs" or "Assigned Projects".
-
Description- this is where you can optionally provide a brief description of this field for your own reference.
-
Table- this is where you can select the data table from which you would like to count records.
-
Currency Type- this is where you can choose a currency type to display within your Count field. At default, the currency type for Count fields is set to No Currency. However, if you are creating a Count field to calculate a currency value you may wish to change this setting to a currency type of your choice, such as "$- USD" or "€- EURO".
-
Format- this is where you can define the location of the currency symbol as it will display within your Count field values. At default, the currency symbol format for Count fields is set to None, which means that no currency symbol will be displayed at default.
If desired, you can change the location formatting of the currency symbol to display either before or after your currency values. For instance, you can change the currency symbol formatting to Prefix which will display the currency symbol before your currency values as illustrated in the image below.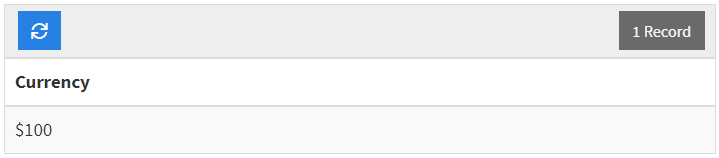
-
Thousand Delimiter- this is where you can define which character you wish to use as a thousands delimiter to separate groups of thousands when viewing your currency values. At default, the thousands delimiter setting for Count fields is set to None, meaning your currency values will display with no thousands delimiter at default and will display as such:

If you wish to change your thousands delimiter setting and choose a delimiter character, you can choose either a comma, period, or space character to separate groups of thousands within your currency values.
For instance, this is how your currency values will display if you change your thousands delimiter setting to Comma:
- Decimal Places- this is where you can define how many digits you wish to appear after the decimal within your count field values. At default, the decimal place setting for Count fields is set to None, meaning count field values will display and be stored as whole digits at default.


An example: Creating a Count field to count the total jobs for each customer.
For instance, say you have a Customers data table, a Jobs data table, and a connection field joining these two data tables which assigns each job to a customer. With a Count field, you can create a complex formula to count the Total Jobs belonging to each customer at any given time.
To create this Total Jobs Count field, select the Count field type from the Numbers field type category on the Add Field menu within your Customers data table.

Name your Count field "Total Jobs" and configure your formula to Count Records from the Jobs data table (where each job is assigned to a customer). Click Save to save your new Total Jobs Count field.
You have just added a Total Jobs Count field to your Customers data table that will count the total jobs for each customer. You can view the results of your count field in action via the GIF below where you can see the Total Jobs field for Customer John Simonds dynamically changing each time a new job is assigned to this customer.
You can further customize your Total Jobs Count field by adding specific data conditions. For instance, you can add a condition to only include completed jobs within the Total Jobs count.
To do this, click on the Add Data Conditions button within your Total Jobs Count field and create a condition to only count jobs where the "Customer" "is" "Completed". Click save to implement this data condition within your count field.

Maximum
Maximum fields are complex formula fields designed to calculate the maximum value from records of a connected data table.
Unlike Basic Formulas, Complex Formulas such as Maximum fields work with connected records.
For instance, say you have a Students data table, a Grades data table, and a connection field joining these two data tables which assigns each grade to a student. With a Maximum field, you can create a complex formula to calculate each student's Highest Grade at any given time.
Maximum fields can only be used to calculate the maximum value of numeric field values.
Sample Maximum Field:

Creating a Maximum Field
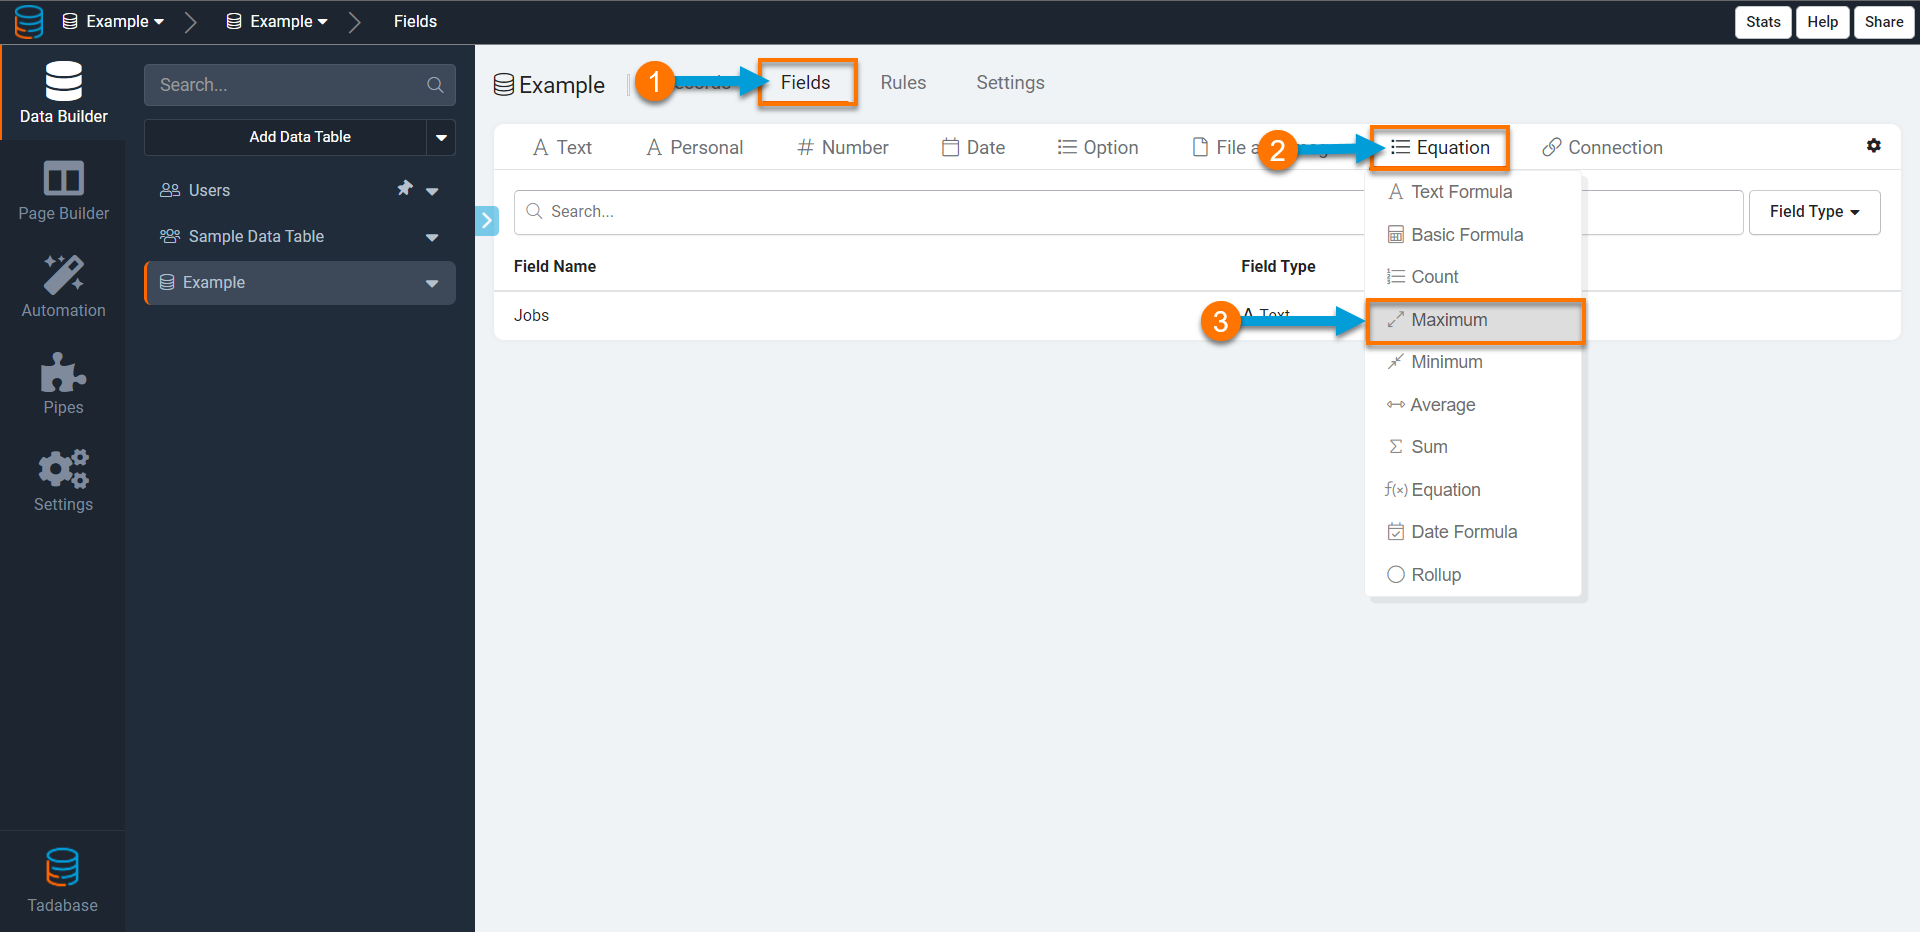
To add a new Maximum field to your data table, click on the Equation field type category on the Add Field menu and select the Maximum field type from the drop-down list.
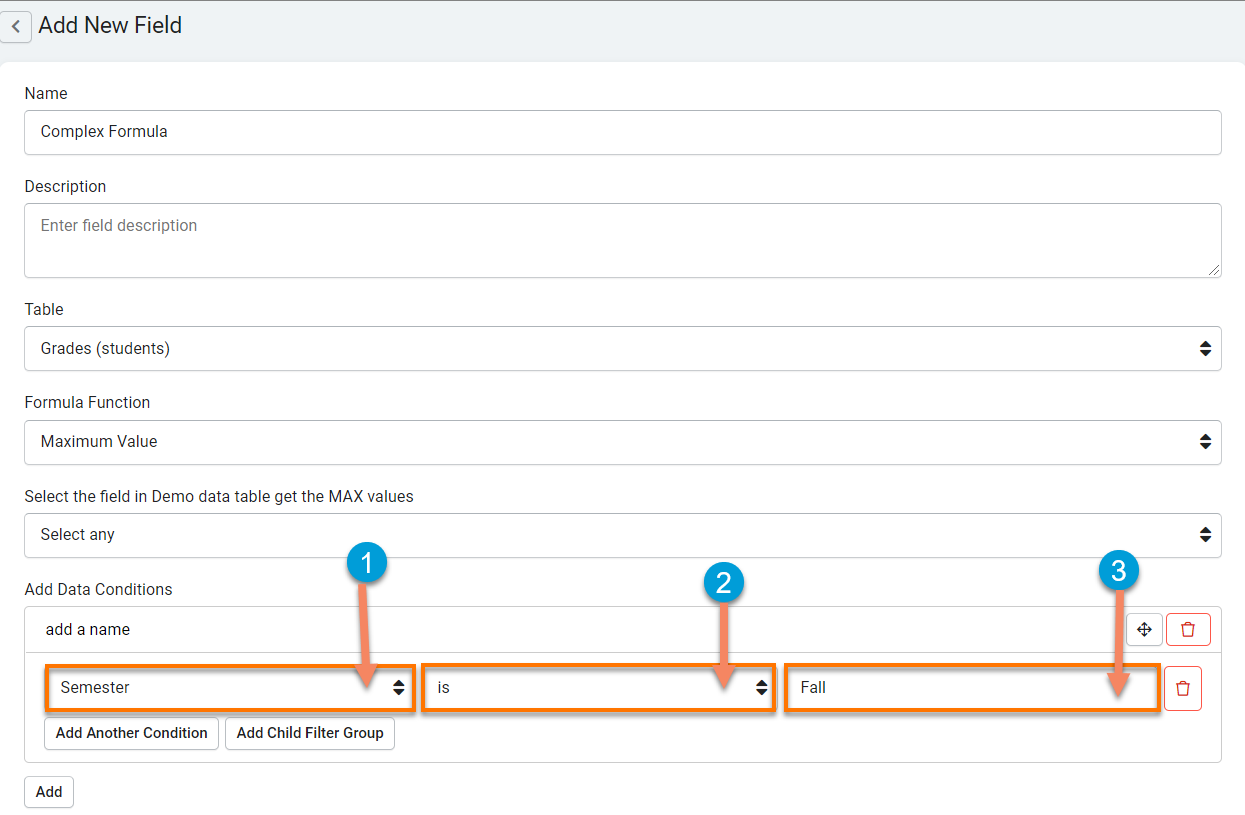
When creating a Maximum field, there are several settings you can customize such as those highlighted in the image below.

-
Name- this is where you can name your Maximum field. For instance, "Highest Grade" or "Biggest Expense".
-
Description- this is where you can optionally provide a brief description of this field for your own reference.
-
Table- this is where you can select the data table from which you would like to calculate the maximum value.
-
Value Field- this is where you can select the field with which you would like to calculate the maximum value. For instance, if you would like to calculate the highest grade for each student, you would use the Grade field within the Grades data table to calculate this value.
-
Add Data Conditions- this is where you can refine your maximum complex formula by adding specific data conditions. For instance, if you would like to calculate the highest grade for each student within the Fall Semester, you can add a data condition to only calculate the highest grade when the "Semester" "is" "Fall".
-
Currency Type- this is where you can choose a currency type to display within your Maximum field. At default, the currency type for maximum fields is set to No Currency. However, if you are creating a Maximum field to calculate a currency value you may wish to change this setting to a currency type of your choice, such as "$- USD" or "€- EURO".
-
Format-this is where you can define the location of the currency symbol as it will display within your Maximum field values. At default, the currency symbol format for Maximum fields is set to None, which means that no currency symbol will be displayed at default.
If desired, you can change the location formatting of the currency symbol to display either before or after your currency values. For instance, you can change the currency symbol formatting to Prefix which will display the currency symbol before your currency values as illustrated in the image below.
-
Thousand Delimiter- this is where you can define which character you wish to use as a thousands delimiter to separate groups of thousands when viewing your currency values. At default, the thousands delimiter setting for Maximum fields is set to None, meaning your currency values will display with no thousands delimiter at default and will display as such:
If you wish to change your thousands delimiter setting and choose a delimiter character, you can choose either a comma, period, or space character to separate groups of thousands within your currency values.
For instance, this is how your currency values will display if you change your thousands delimiter setting to Comma:
- Decimal Places- this is where you can define how many digits you wish to appear after the decimal within your Maximum field values. At default, the decimal place setting for Maximum fields is set to None, meaning Maximum field values will display and be stored as whole digits at default.

An example: Creating a Maximum field to calculate each student's highest grade.
For instance, say you have a Students data table, a Grades data table, and a connection field joining these two data tables which assigns each grade to a student. With a Maximum field, you can create a complex formula to calculate each student's Highest Grade at any given time.
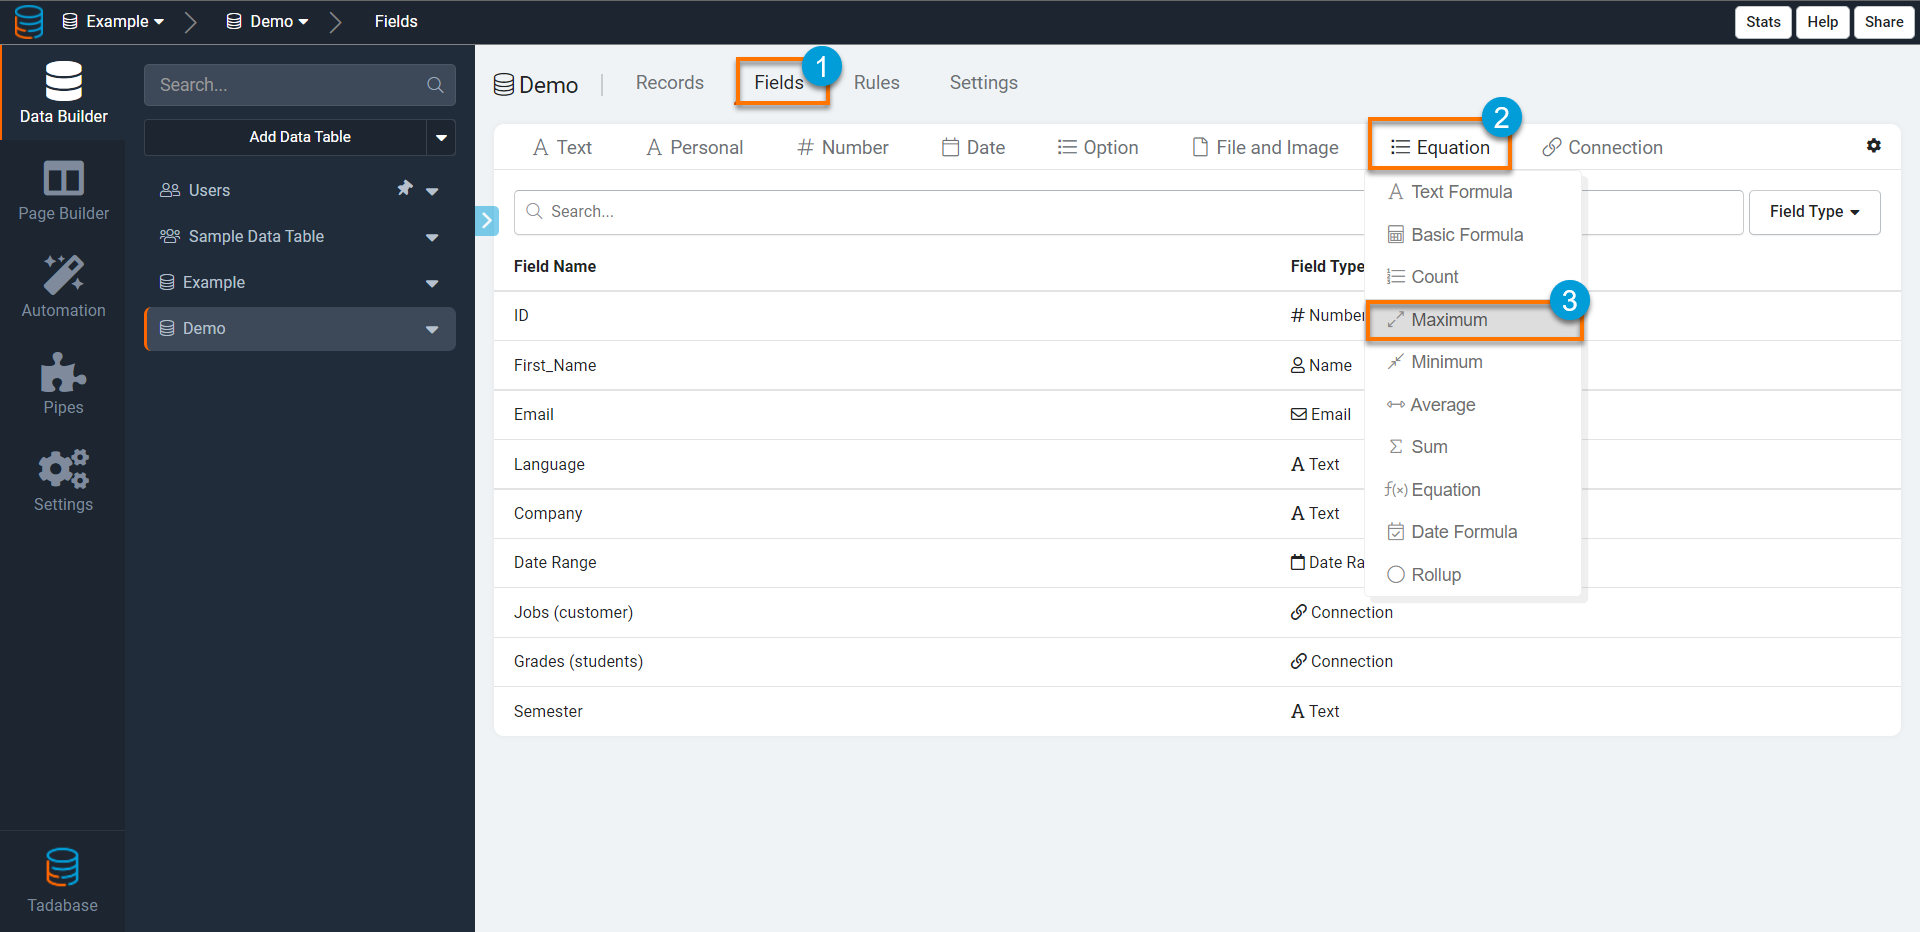
To create this maximum field, click on the Maximum field type on the Equation field type category on the Add Field menu within the Students data table.
Name your Maximum field "Highest Grade" and configure your formula to calculate the maximum value from records within the Grades data table (where each grade is assigned to a student) using the Grade field. Click Save to save your new Highest Grade Maximum field.

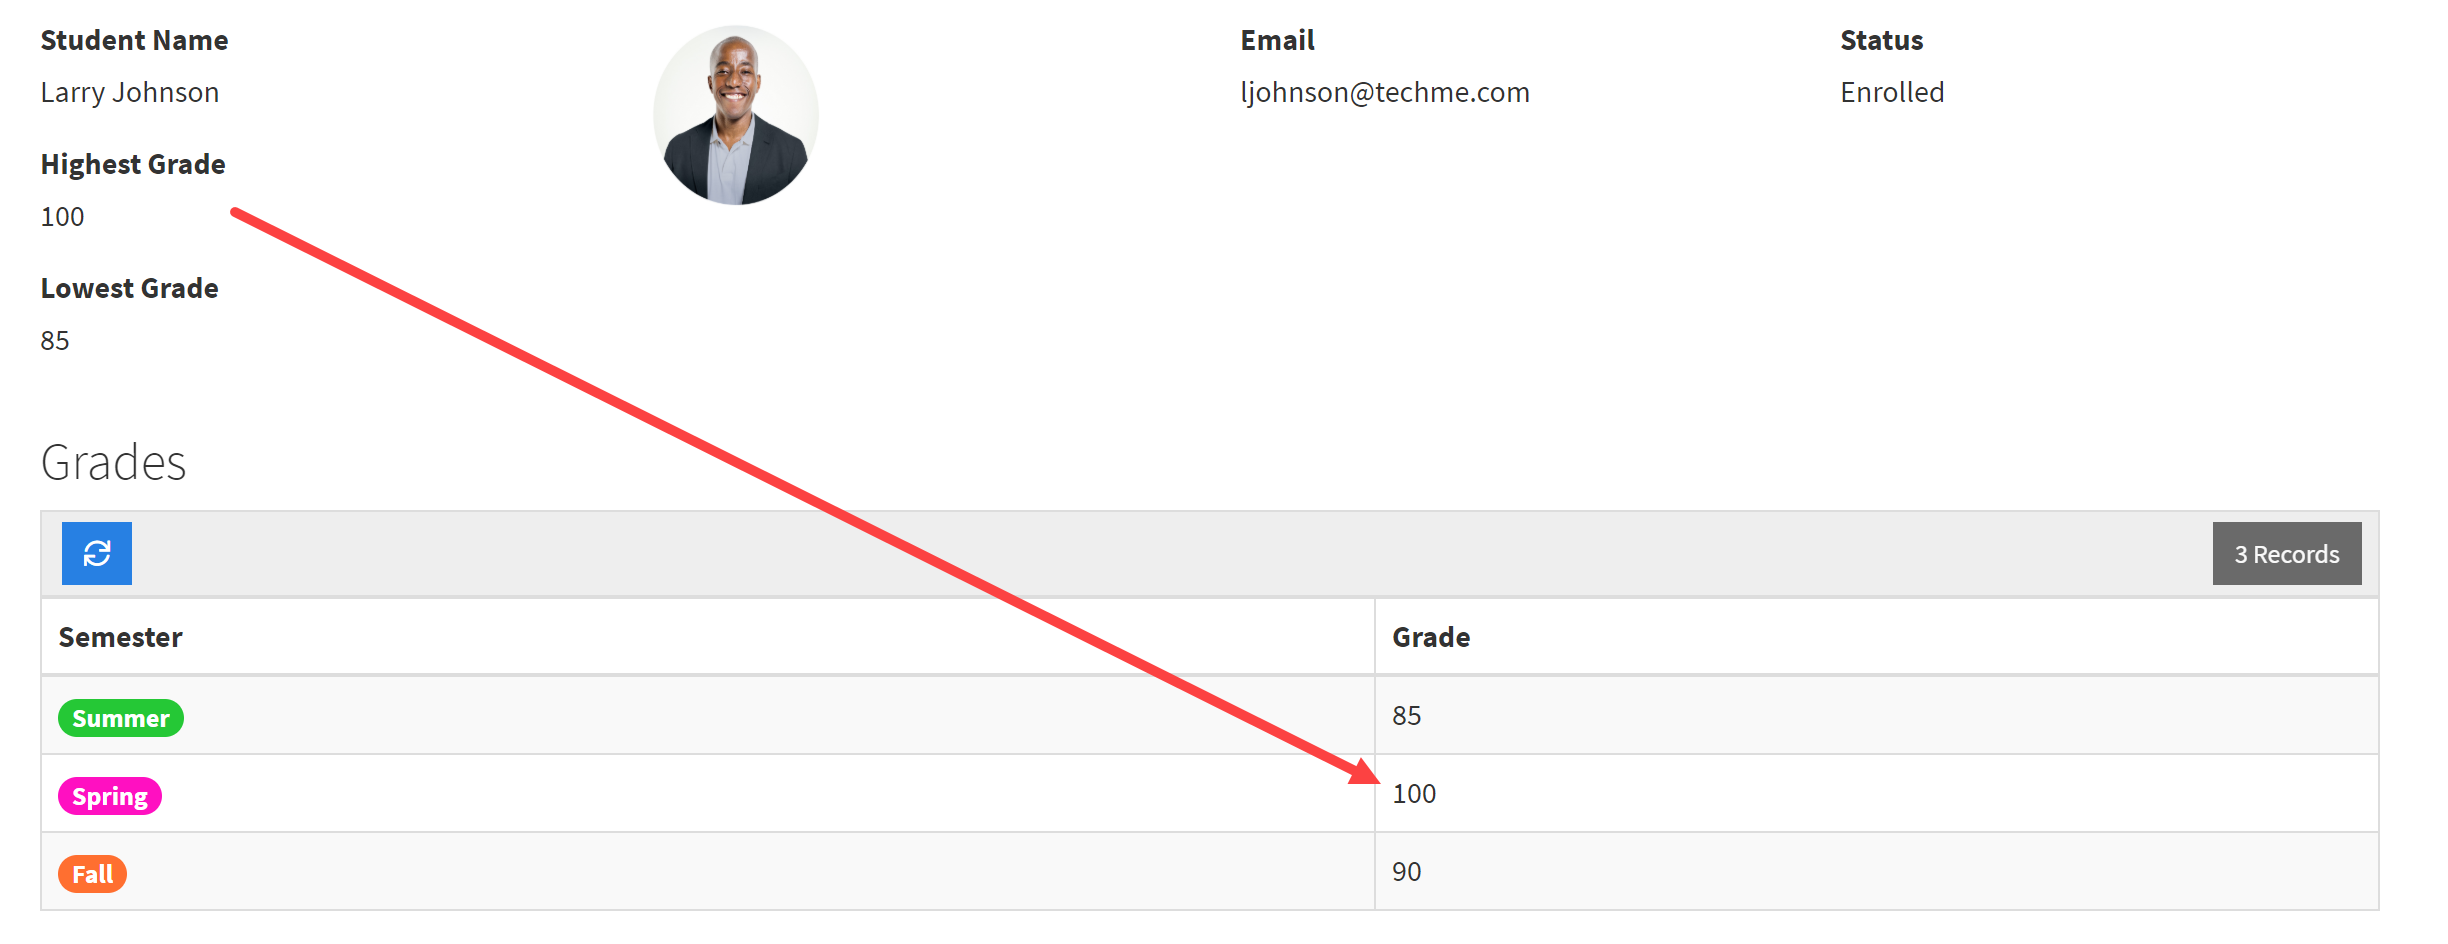
You have just added a Highest Grade Maximum field to your Students data table that will calculate each student's highest grade. You can view the results of your Maximum field in action as it would display on your live application via the image below.
Minimum
Minimum fields are complex formula fields designed to calculate the minimum value from records of a connected data table.
Unlike Basic Formulas, Complex Formulas such as Minimum fields work with connected records.
For instance, say you have a Students data table, a Grades data table, and a connection field joining these two data tables which assigns each grade to a student. With a Minimum field, you can create a complex formula to calculate each student's Lowest Grade at any given time.
Minimum fields can only be used to calculate the minimum value of numeric field values.
Sample Minimum Field:

Creating a Minimum Field
To add a new Minimum field to your data table, click on the Number field type category on the Add Field menu and select the Minimum field type from the drop-down list.
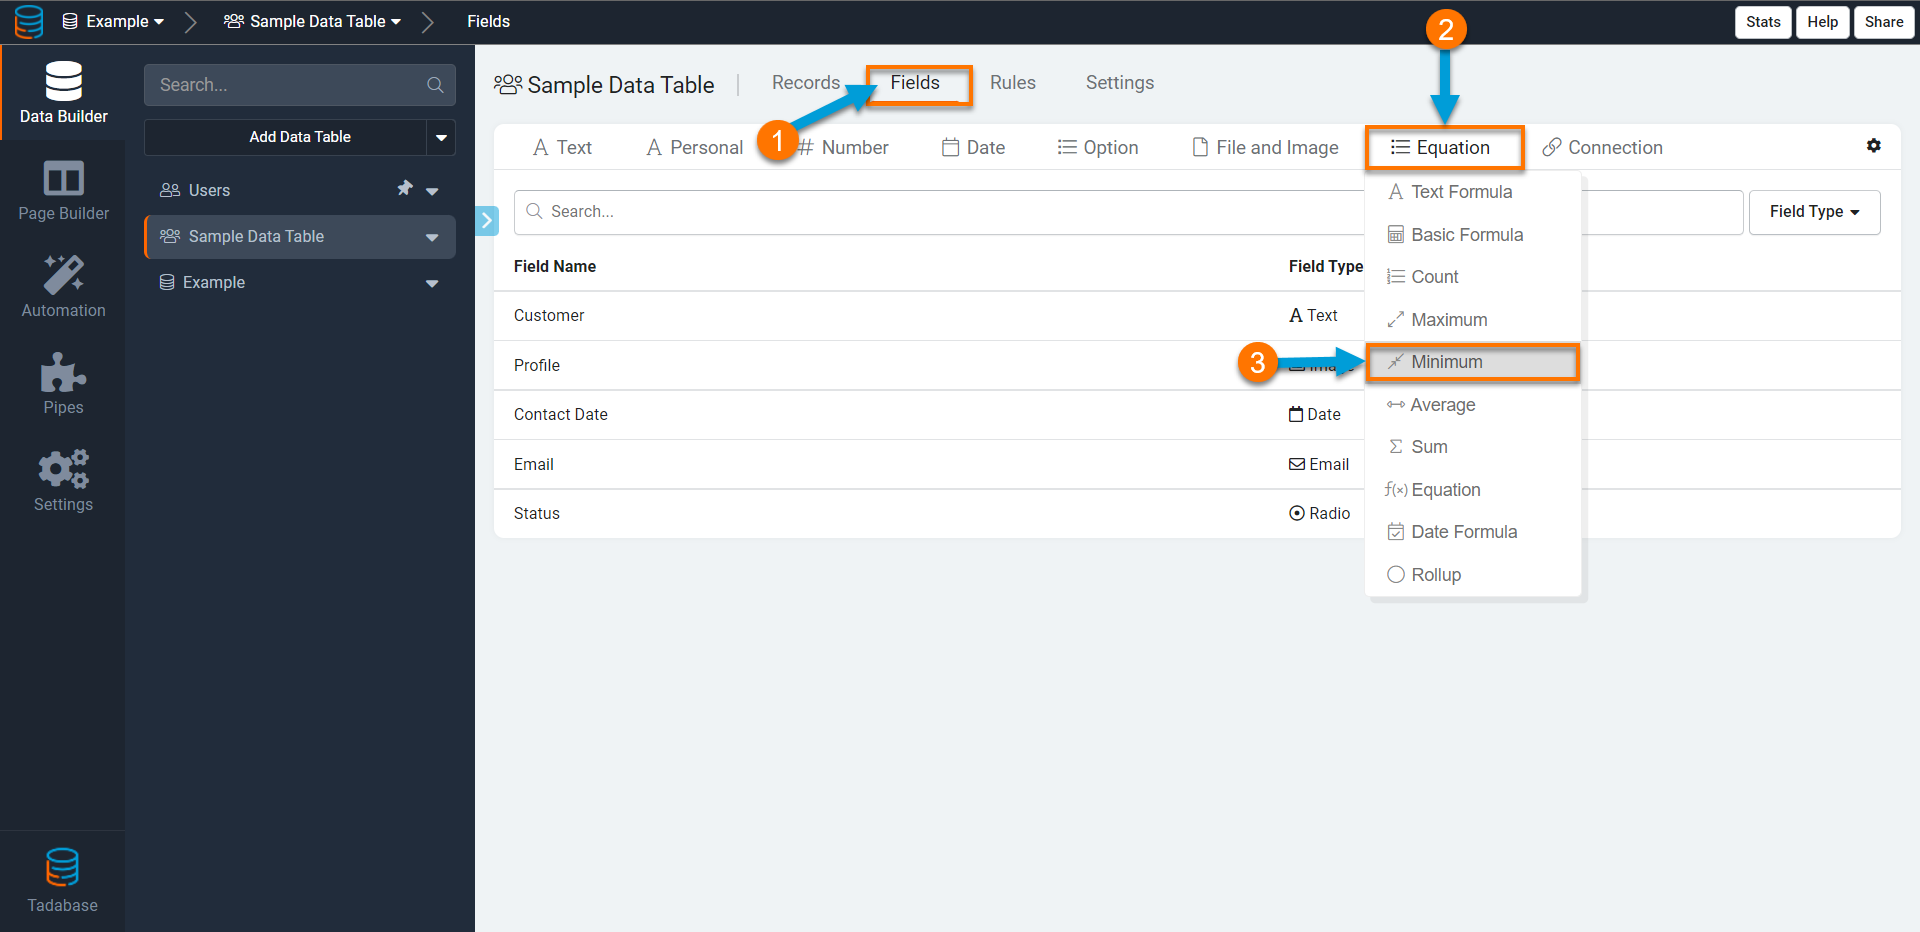
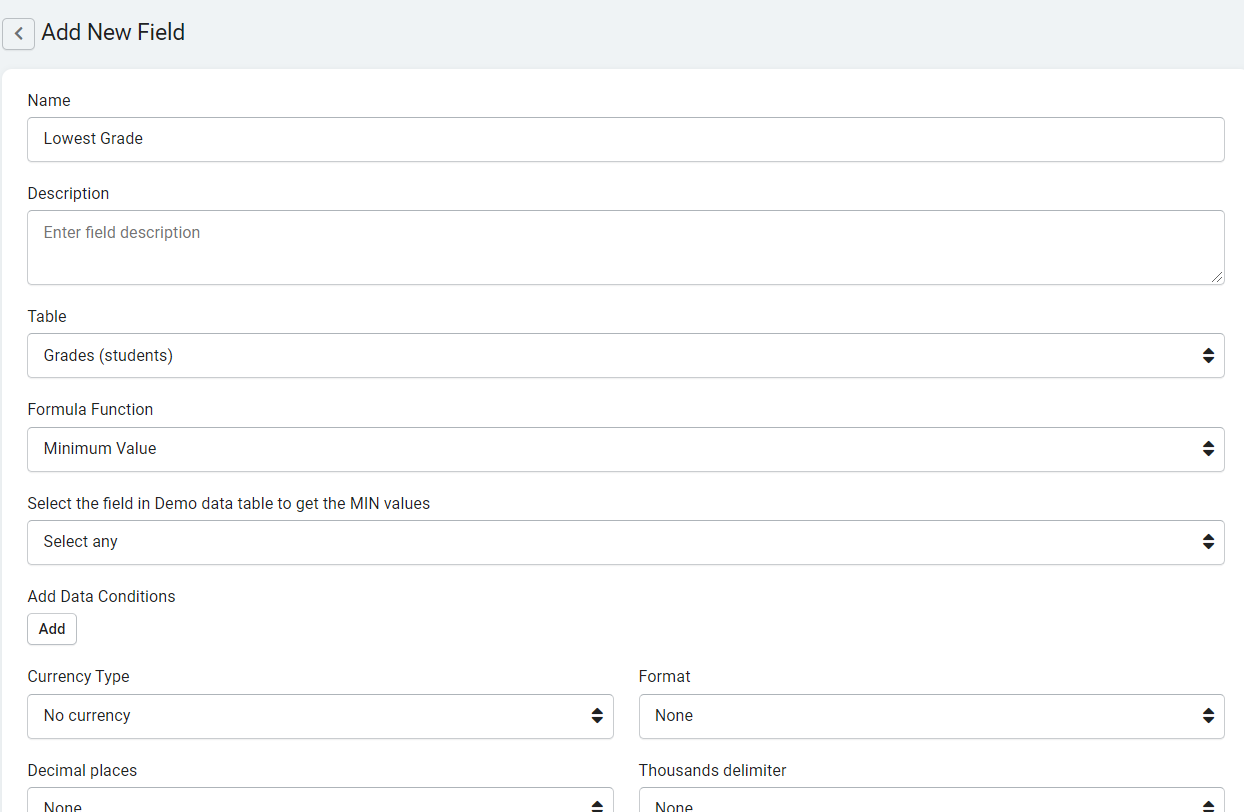
When creating a Minimum field, there are several settings you can customize such as those highlighted in the image below.

-
Name- this is where you can name your Minimum field. For instance, "Lowest Grade" or "Smallest Expense".
-
Description- this is where you can optionally provide a brief description of this field for your own reference.
-
Formula Function- this is where you can select the function you would like this complex formula to accomplish. As this is a Minimum complex formula field, the default function is set to "Minimum Value".
-
Table- this is where you can select the data table from which you would like to calculate the minimum value.
-
Value Field- this is where you can select the field with which you would like to calculate the minimum value. For instance, if you would like to calculate the lowest grade for each student, you would use the Grade field within the Grades data table to calculate this value.
-
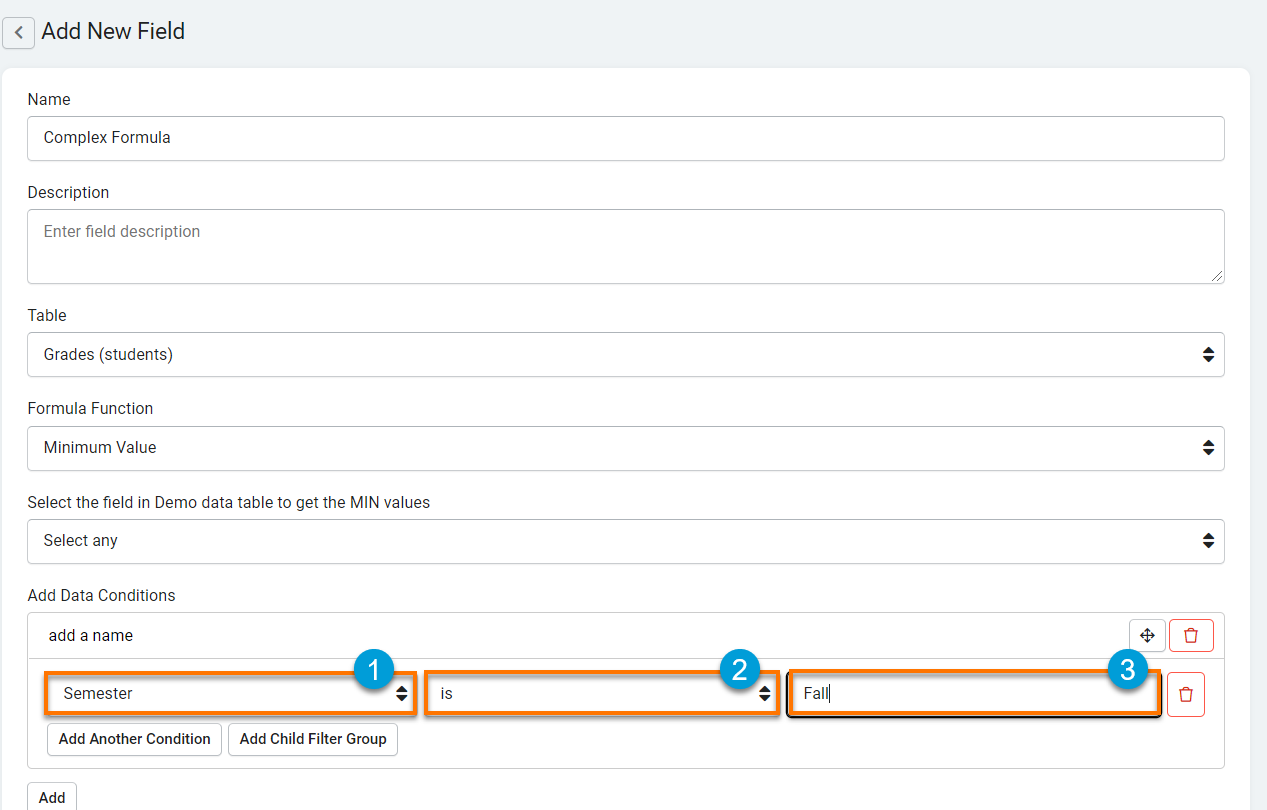
Add Data Conditions- this is where you can refine your minimum complex formula by adding specific data conditions. For instance, if you would like to calculate the lowest grade for each student within the Fall Semester, you can add a data condition to only calculate the lowest grade when the "Semester" "is" "Fall".
-
Currency Type- this is where you can choose a currency type to display within your Minimum field. At default, the currency type for minimum fields is set to No Currency. However, if you are creating a Minimum field to calculate a currency value you may wish to change this setting to a currency type of your choice, such as "$- USD" or "€- EURO".
-
Format-this is where you can define the location of the currency symbol as it will display within your Minimum field values. At default, the currency symbol format for Minimum fields is set to None, which means that no currency symbol will be displayed at default.
If desired, you can change the location formatting of the currency symbol to display either before or after your currency values. For instance, you can change the currency symbol formatting to Prefix which will display the currency symbol before your currency values as illustrated in the image below.
-
Thousand Delimiter- this is where you can define which character you wish to use as a thousands delimiter to separate groups of thousands when viewing your currency values. At default, the thousands delimiter setting for minimum fields is set to None, meaning your currency values will display with no thousands delimiter at default and will display as such:
If you wish to change your thousands delimiter setting and choose a delimiter character, you can choose either a comma, period, or space character to separate groups of thousands within your currency values.
For instance, this is how your currency values will display if you change your thousands delimiter setting to Comma:
- Decimal Places- this is where you can define how many digits you wish to appear after the decimal within your minimum field values. At default, the decimal place setting for Minimum fields is set to None, meaning Minimum field values will display and be stored as whole digits at default.

An example: Creating a Minimum field to calculate each student's lowest grade.
For instance, say you have a Students data table, a Grades data table, and a connection field joining these two data tables which assigns each grade to a student. With a Minimum field, you can create a complex formula to calculate each student's Lowest Grade at any given time.
To create this minimum field, click on the Minimum field type on the Number field type category on the Add Field menu within the Students data table.

Name your Minimum field "Lowest Grade" and configure your formula to calculate the minimum value from records within the Grades data table (where each grade is assigned to a student) using the Grade field. Click Save to save your new Lowest Grade Minimum field.
You have just added a Lowest Grade Minimum field to your Students data table that will calculate each student's lowest grade. You can view the results of your Minimum field in action as it would display on your live application via the image below.

Average
Average fields are complex formula fields designed to calculate the average value from records of a connected data table.
Unlike Basic Formulas, Complex Formulas such as Average fields work with connected records.
For instance, say you have a Students data table, a Grades data table, and a connection field joining these two data tables which assigns each grade to a student. With an Average field, you can create a complex formula to calculate each student's Average Grade at any given time.
Average fields can only be used to calculate the average value of numeric field values.
Sample Average Field:

Creating an Average Field
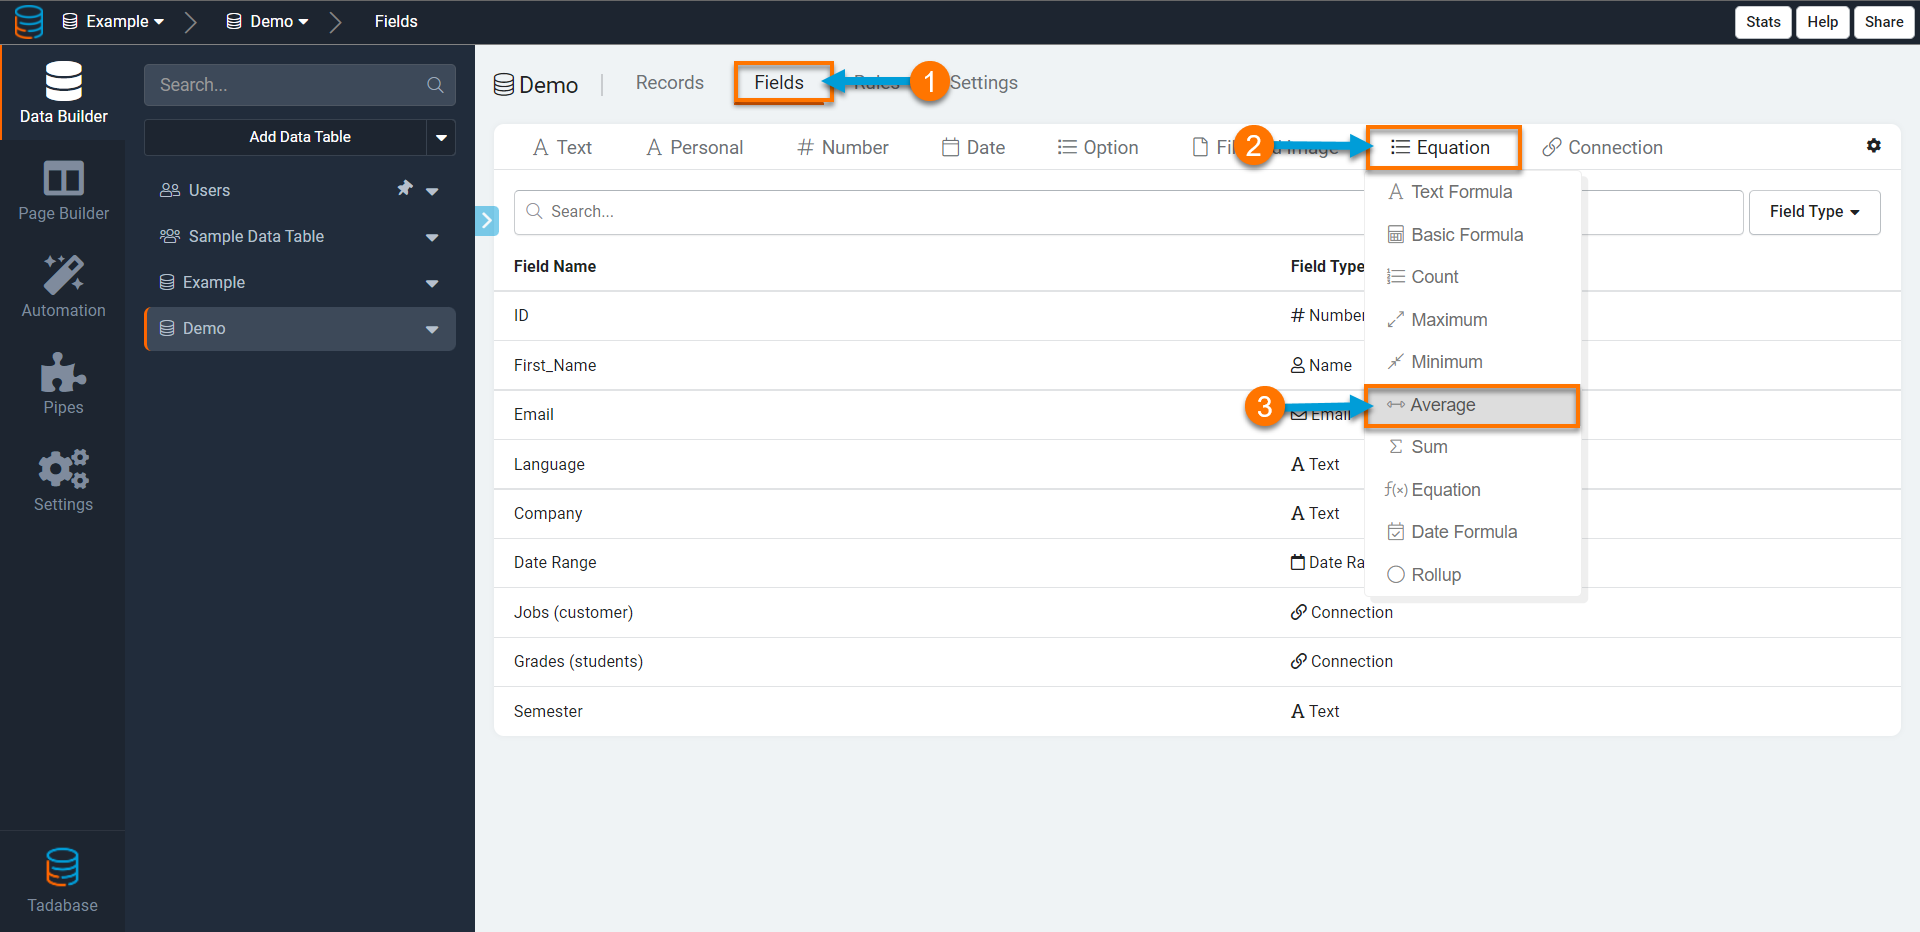
To add a new Average field to your data table, click on the Number field type category on the Add Field menu and select the Average field type from the drop-down list.

When creating an Average field, there are several settings you can customize such as those highlighted in the image below.

-
Name- this is where you can name your Average field. For instance, "Average Grade" or "Average Cost".
-
Description- this is where you can optionally provide a brief description of this field for your own reference.
-
Table- this is where you can select the data table from which you would like to calculate the average value.
-
Currency Type- this is where you can choose a currency type to display within your Average field. At default, the currency type for average fields is set to No Currency. However, if you are creating an Average field to calculate a currency value you may wish to change this setting to a currency type of your choice, such as "$- USD" or "€- EURO".
-
Format- this is where you can define the location of the currency symbol as it will display within your Average field values. At default, the currency symbol format for average fields is set to None, which means that no currency symbol will be displayed at default.
If desired, you can change the location formatting of the currency symbol to display either before or after your currency values. For instance, you can change the currency symbol formatting to Prefix which will display the currency symbol before your currency values as illustrated in the image below.
-
Thousand Delimiter- this is where you can define which character you wish to use as a thousands delimiter to separate groups of thousands when viewing your currency values. At default, the thousands delimiter setting for average fields is set to None, meaning your currency values will display with no thousands delimiter at default and will display as such:
If you wish to change your thousands delimiter setting and choose a delimiter character, you can choose either a comma, period, or space character to separate groups of thousands within your currency values.
For instance, this is how your currency values will display if you change your thousands delimiter setting to Comma:
- Decimal Places- this is where you can define how many digits you wish to appear after the decimal within your average field values. At default, the decimal place setting for average fields is set to None, meaning average field values will display and be stored as whole digits at default.
An example: Creating an Average field to calculate each student's average grade.
For instance, say you have a Students data table, a Grades data table, and a connection field joining these two data tables which assigns each grade to a student. With an Average field, you can create a complex formula to calculate each student's Average Grade at any given time.
To create this average field, click on the Average field type on the Number field type category on the Add Field menu within the Students data table.
Name your Average field "Average Grade" and configure your formula to calculate the average value from records within the Grades data table (where each grade is assigned to a student) using the Grade field. You can change the decimal places setting to display two digits after the decimal when displaying each student's Average Grade within components on the live app. Click Save to save your new Average Grade field.

You have just added an Average Grade field to your Students data table that will calculate each student's average grade. You can view the results of your new average field in action as it would display on your live application via the image below.

Sum
Sum fields are complex formula fields designed to sum records of a connected data table.
Unlike Basic Formulas, Complex Formulas such as Sum fields work with connected records.
For instance, say you have a Customers data table, a Jobs data table, and a connection field joining these two data tables which assigns each job to a customer. With a Sum field, you can create a complex formula to sum the Total Cost of each customer's jobs at any given time.
Sum fields can only be used to sum numeric fields.
Sample Sum Field:

Creating a Sum Field
To add a new sum field to your data table, click on the Number field type category on the Add Field menu and select the sum field type from the drop-down list.

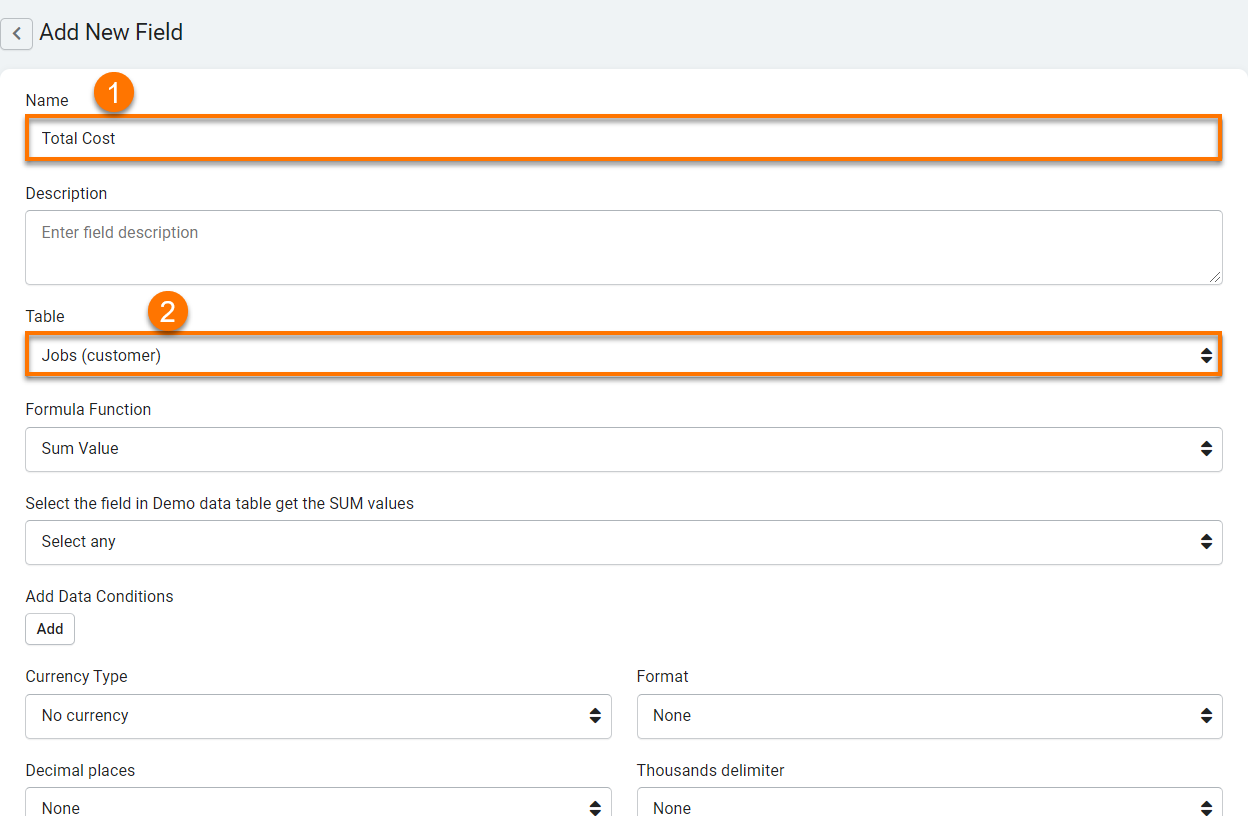
When creating a Sum field, there are several settings you can customize such as those highlighted in the image below.

-
Name- this is where you can name your sum field. For instance, "Total Cost" or "Total Expenses".
-
Description- this is where you can optionally provide a brief description of this field for your own reference.
-
Table- this is where you can select the data table from which you would like to sum records.
-
Currency Type- this is where you can choose a currency type to display within your sum field. At default, the currency type for sum fields is set to No Currency. However, if you are creating a sum field to calculate a currency value you may wish to change this setting to a currency type of your choice, such as "$- USD" or "€- EURO".
-
Format-this is where you can define the location of the currency symbol as it will display within your sum field values. At default, the currency symbol format for sum fields is set to None, which means that no currency symbol will be displayed at default.
If desired, you can change the location formatting of the currency symbol to display either before or after your currency values. For instance, you can change the currency symbol formatting to Prefix which will display the currency symbol before your currency values as illustrated in the image below.
-
Thousand Delimiter- this is where you can define which character you wish to use as a thousands delimiter to separate groups of thousands when viewing your currency values. At default, the thousands delimiter setting for sum fields is set to None, meaning your currency values will display with no thousands delimiter at default and will display as such:
If you wish to change your thousands delimiter setting and choose a delimiter character, you can choose either a comma, period, or space character to separate groups of thousands within your currency values.
For instance, this is how your currency values will display if you change your thousands delimiter setting to Comma:
- Decimal Places- this is where you can define how many digits you wish to appear after the decimal within your sum field values. At default, the decimal place setting for sum fields is set to None, meaning sum field values will display and be stored as whole digits at default.
An example: Creating a Sum field to sum the total cost of each customer's jobs.
For instance, say you have a Customers data table, a Jobs data table with a Costfield, and a connection field joining these two data tables which assigns each job to a customer. With a Sum field, you can create a complex formula to sum the Total Cost of each customer's jobs at any given time.
To create this sum field, click on the Sum field type on the Equation field type category on the Add Field menu within the Customers data table.

Name your Sum field "Total Cost" and configure your formula to sum records from the Jobs data table (where each job is assigned to a customer) using the Cost field. Click Save to save your new Total Cost Sum field.
You have just added a Total Cost Sum field to your Customers data table that will sum the total cost of each customer's jobs. You can view the results of your Sum field in action via the GIF below where you can see the Total Cost field for Customer John Simonds dynamically changing each time a new job is assigned to this customer.